Saturday 30 August 2008

Blackberry Muffins

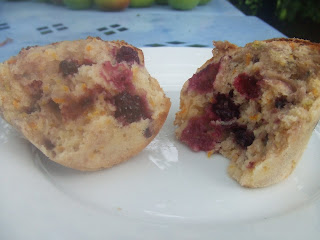
My final blackberry recipe of the season – and a good one to round them all up. I have made one full batch of 12 yummy muffins, and two half batches of this recipe now which makes 24 muffins for 3 people in less than a week. Proof indeed that these are tasty.
I don’t really know why but I did really enjoy this recipe and now know it pretty much off by heart. You just combine the dry ingredients in one bowl, the wet ingredients in another and then gently fold the wet into dry. Finally, being extremely careful not to over mix, you fold in the blackberries.
You don’t need to grease the tins (I used my Jamie Oliver silicone muffin pan) and they pop out really easily. The first time I made them I didn’t have any buttermilk so I used plain yogurt thinned slightly with milk until it was the consistency of buttermilk. The other two times I used regular buttermilk but they both worked perfectly. The original recipe calls for the zest 1 orange per batch, but eve when I halved the amounts of everything else I kept one whole orange, because a)it was silly to grate just half one orange and b) I like them extra fruity. I would use 2 oranges for the whole batch in future.


I liked how the blackberries leaked out juice and made the mix have purply streaks, and then cooked to stain the muffin around it all pretty and pink! Go to the Good Food website for the recipe.

Friday 29 August 2008

Blackberry and Apple Mania!

If you love blackberries (or apples...) but can’t get any near you then look away because this post holds 5 yummy blackberry or apple (or both) baked puddings! After last Fridays successful blackberry gathering down by the Thames, we took our supply up to Suffolk where we picked more! We also gathered the glut of apples on our huge apple tree in the garden and then made these.....

First – blackberry and apple compote. Peel, core and chop your apples, add loads of blackberries, put on the heat and wait. You end up with delicious deep purple compote which I like best with Greek yogurt and a little bit of brown sugar for breakfast.


Next – Blackberry and apple crumble! Crumble is the first recipe I ever learnt to make and it is very simple. I often make it on holiday because all you really need is a bowl, caster sugar, butter and flour. I love rubbing it all together and thinking “this is never going to come together” and then in just a few minutes ending up with fine breadcrumbs. I like using slightly soft butter because it is easier and quicker to rub, but if I am making it at home I do it in the Magimix.

Sometimes I use tinned peaches or apricots for the filling, and once tinned pineapple, but my all time favourite is strawberry and rhubarb crumble! In Spain we used plums and sometimes we add oats or ground almonds to the crumble mix but mainly just leave it simple. This one was very good!
Thirdly – heaped blackberry and apple pie. One day we went to Ipswich and the Lakeland store there (I’m a bit sad - I loved it there and was choosing things to buy when I grow up!) . When we were there we bought (among other things!) a pie dish. As soon as I got home I put it to use making this delicious yummy pie. I liked the pie dish because it had a smaller dish with holes in that fitted snugly inside and was for baking things “blind” instead of using baking beans etc. I pressed down the pastry, put the small hole dish on top, baked for 10 minutes and it came out great! Then I piled in the apples and blackberries and covered with the remaining pastry. My sister carved in some stars and leaves on the pastry, we cooked it for about 20 minutes and it came out delicious! I was very proud because it was my first time making pastry and my first pie :)

Before...


And after!


Fourthly, (?) the simplest pudding – baked apples! Whilst at Lakeland we also bought these nifty baked apple cookers.
They came with a corer and we just cored the apples, secured them in the cooker, topped with mixed fruit, butter and sugar, covered with the lid and microwaved for a few minutes!

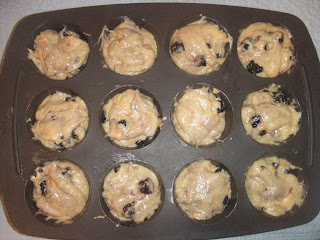
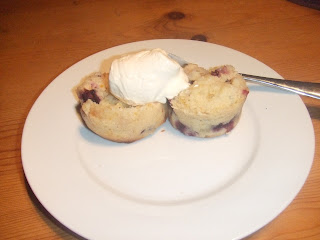
Fifth and finally, blackberry muffins. I will post more about these tomorrow but they are VERY good (I have made three batches in a week and there are only three members of my family eating them!). I really liked the recipe (from BBC Good Food Magazine) and know I shall make these again in the future. Now, however, I am all blackberried out and have some savoury recipes in the pipeline! Savoury - eek!!!
Friday 22 August 2008

Mincemeat and Marzipan Tea Loaf, + a holiday!

This evening we are going to our little cottage (click on the link to see it!) in Orford, Suffolk and will be there until a week on Sunday. I absolutely love going there – the gorgeous village of Orford, the country pubs and restaurants, the farmers markets, pick-your-own farms and country walks! The downside is there is no internet connection so I won’t be able to post or read your blogs. I shall enjoy catching up when I return refreshed and full of country air :)
Today I had some friends coming over to go blackberry picking and I knew we would want something yummy afterwards, so this morning I made a lovely Mincemeat and Marzipan tea loaf, which I got from Tulip’s blog. It was absolutely delicious; crumbly cake, squidgy squares of marzipan and crunchy almonds on top. Even one of my friends who doesn’t normally like marzipan really enjoyed this loaf.
Normally when baking I get scared about over cooking things so I put them in for 10mins less then the suggested cooking time. This normally results in me putting the timer on for 2 minutes, then another 3 minutes and jumping up and down to check so many times that by the end whatever I am trying to make will have been in for the correct time after all! Today I just went for it and put the cake in for the suggested hour, covered the top with foil after 45minutes, and on the hour it was perfect!
It came out the oven at about 11am and at about 5pm it was still slightly warm inside! I shall be taking the rest of the loaf to Suffolk with me. Go over to Tulip’s blog, Tulips Kitchen now for the recipe (you won’t be disappointed!) and also the chance to read a great blog! I will see you in a week.
P.S. You may have also noticed I have joined Baking from Scratch (click on the photo <<<>
P.P.S. The blackberry picking was great, we picked loads and now they are all ready to be made into jam, pies, stewed with apple, crumble - endless good things!

Wednesday 20 August 2008

Fish Smelts....????

This is just a random question but I was reading the new Coast magazine the other day (hehe) and it mentioned a new fish and chip shop opening which would serve not only the normal fish and chips, fishcakes etc but also "fish smelts". Neither my Mum or I have the foggiest what this is...can anybody help??

Thanks x

Tuesday 19 August 2008

Fat Rascals

The past few days have been fairly busy sorting things out from out holiday and also trying to sort out the whole house after builders laid a lovely new floor on our whole bottom floor whilst we were away. The view from the bottom terrace!
As I said previously, we had a lovely holiday relaxing, enjoying the views from one of the suntrap terraces as above, or just chilling out by the pool with a good book – but some days we did go out and on one in particular we drove down about 2hours to the famous Alhambra gardens on the mountains beside Grenada. A view over Grenada old town (which we visited on my Dad's birthday!) from the Alhambra.

The gardens were beautiful and we did have a nice time looking round the various palaces dotted around the gardens. As it was my Mum’s birthday we ate at restaurant called the San Francisco Parador for a birthday lunch – I can report that some parts were good (my orange chocolate ice cream cake!) other parts were very disappointing (a surprise starter soup where we couldn’t quite work out what the flavour was). We didn’t see everywhere because that day temperatures were around 38’C-40’C and we were desperate to get back to the icy pool! Me in the Alhambra!

Today I made Fat Rascals! I was going to help make birthday cake for my Daddy but the tins are still in storage so that is tomorrows project. These Fat Rascals, however, certainly did not disappoint! They are a cross between a scone and a rock cake and the idea originated in Yorkshire where the recipe was a simple dough with currants. I have watched my Mum make these before (and enjoyed the end result!) so decided to have a go myself. It is a recipe from the Waitrose website, and these cakes are served at Betty’s tearooms in York. They worked a treat. The idea is to make about 6 huge scones and drop them in a “rascally fashion” onto the baking tray. The method is rather similar to the Welsh Cakes I made.


I didn’t have some of the exact ingredients and the weather is so awful I wasn’t eager to go out so I made some easy substitutions – which as usual are in pink with the recipe. Very good results – I would definitely recommend these.

Fat Rascals, from Waitrose Magazine

Makes 6

Ingredients: 150g plain flour, sieved
150g self-raising flour, sieved
1tsp baking powder
130g cold butter, cubed
90g caster sugar
Grated zest of both one orange and one lemon (I used the grated zest of a lime)
1tsp cinnamon (I used 1tsp of ground mixed spice instead which contains cinnamon and nutmeg) ½ tsp freshly grated nutmeg (see above)
150g mixed dried fruit (I used 150g currants)
50ml milk
Glace cherries and blanched almonds to decorate

1. Preheat the oven to 200’C.

2. Sieve both flours and the baking powder into a bowl. Add the butter and rub into the mixture until it resembles breadcrumbs.

3. Add the sugar, zests, spices and dried fruit and mix well.

4. Add the beaten egg and enough milk to bring the mixture together into a soft (read sticky) dough.

5. Form the mixture into 6 saucer sized rounds – 2cm deep.

I split my dough into 2 batches - so if anything went wrong with the first I could alter
the problem and rescue the second lot. Luckily, everything worked well!
6. Transfer to a non-stick baking tray and make for 15-20mins.

7. They are best served warm with butter and jam, but can be frozen and reheated.

Because he has now had to wait 4 days before getting birthday cake, I made a special Fat Rascal just for my Dad:
The end result was delicious - buttery, crumbly dough, sharp currants, crunchy almonds and oh-so-sweet glace cherries! Enjoy! x

Sunday 17 August 2008

And I'm Back!

Earlier this evening we finally got back from Spain! We had a great 2 weeks - admittedly not doing a whole lot other than lounging by the pool - but it was lovely and relaxing. Our villa was fabby and the pool amazing! We celebrated both my parents birthdays although we are having an honourary birthday for my Daddy tomorrow as his birthday was the 16th August but he wants a nice home cooked meal and, perhaps most importantly, a home baked cake! Hopefully tomorrow I will be able to post a longer post with a chocolate cake recipe.

I have enjoyed catching up on everyones blogs - I seem to have missed a lot and everyone has cooked some amazing treats.

Our kitchen is slowly coming along but oh will I be pleased to have tidy cupboards and proper worktops rather than cardboard and general havoc.

See you tomorrow for a couple of holiday pictures and a recipe or two,

Lucy x

Friday 8 August 2008

The Ultimate Brownie!

As you read this I am in Spain and hopefully having a great time. As I write this, however, I am busy packing and getting ready for that holiday so this may be short and full of pictures!
Also as you read this on the 8th August - it is my Mum's birthday! I thought she definitely deserved a mention on here as she is fantastic! She does catering for parties and helping or watching her make huge batches of 150 canapes is truly amazing! She is my inspiration for cooking and I am extremely envious of her talent. Happy Birthday Mummy!
Now, before I get on to the brownies, here are the pictures of the Little Mocha Kisses sandwiched together with coffee icing. The recipe said chocolate but I was out of cocoa powder and didn’t want to get any, plus as I had been disappointed with the coffee flavour and my Dad likes coffee I thought the icing would be a good way to enhance it. And, for once, I was right!

I thought the icing made the cookies better and I think the coffee flavour worked better than the chocolate would have done. My icing was quite wet because I kept adding more coffee as I wanted that strong taste I have had in previous coffee cakes etc. Although I would say it made quite a lot of icing I think it might work well for the batch it is just lots had been eaten by the time I got round to sandwiching!

But enough of the kisses! Brownie time! As you can probably guess from the title I am a real fan of these brownies. They are perfect in my eyes – a nice crunchy topping, then getting softer and squidgier as you go down to the bottom. Beautifully chocolatey and rich. Fairly simple to make and – perhaps best of all, it makes a large pan full!
So here is the recipe:

Brownies, from How to Be A Domestic Goddess by Nigella Lawson

Fills a 33 by 23 by 5 ½ cm tin, or Nigella says a maximum of 48 brownies. I say – a lot!
375g soft unsalted brownies
375g best-quality dark chocolate
6 large eggs
1tbsp vanilla extract
500g caster sugar
225g plain flour
1 tsp salt
300g chopped walnuts (because I hate nuts apart from almonds and my sis isn’t that keen, we never use these. I think it spoils the gooey texture as well.)

1. Preheat the oven to 180’C/gas mark 4. Line your brownie pan – sides as well – with parchment.

2. Melt the butter and chocolate together in a large heavy based saucepan. In a bowl or large measuring jug, beat the eggs with the sugar and vanilla. Measure the flour into another bowl and add the salt.

3. When the chocolate mixture has melted, let it cool for a bit before beating in the eggs and sugar, then the nuts (if using) and flour. Beat to combine smoothly and then scrape out of the saucepan into the lined pan.

4. Bake for about 25 minutes. When its ready, the top should be dried to a paler brown speckle but the middle still dark and dense and gooey. Even with such a big batch, keep alert, keep checking, the difference between gungy brownies and dry brownies is only a few minutes! Also, they will continue to cook as they cool.

Yum!

Friday 1 August 2008

Give me a kiss!

I wanted my next bake to be something a bit different that could hopefully result looking more professional! My Mum thought about it overnight and in the morning she gave me two recipes: one for Little Mocha Kisses and one for Oaty Biscuits. I made oat biscuits a couple of months ago and they went horribly wrong so I picked the mocha kisses! They were from Rachel Allen’s Food for Living and I enjoy her programmes (am excited about the latest series due out all about baking!) so they sounded promising. The basic idea was that you made 50-60 little heart shaped coffee biscuits which you then sandwiched together with chocolate buttercream. Hmm...that’s not quite what happened here!
The dough was simple to make especially as I picked the option of whizzing it all in the magimix. You effectively just make an outblanced crumble mixture and add coffee and an egg! Rachel Allen added as a P.S. at the bottom of the recipe that the dough may be soft and could be frozen for 10 minutes to make it easier to handle. A strong understatement? Or perhaps just the fact it was very hot and muggy yesterday but my dough was extremely soft and definitely could not be rolled out. I doubted there would be room in my freezer so popped the mixture in the fridge and left it for 2 hours! I thought this would be enough but every time I tried to take it out it was completely sticky again in a minute! Eventually I gave up dealing with the sticky goop and shoved everything out the way in my freezer, split the dough into 2, wrapped each in baking parchment and left them in the freezer for 10 minutes. Sure enough it worked a treat! Should have followed the recipe from the start.

My rolling pin seems to still be in hiding and this really did cause problems. I tried dusting my water bottle but it just got stuck to the dough. I was really getting sick of this dough now so I just banged it out with my fist and got cutting! The hearts looked very sweet all lined up on their trays (lined with paper – I wasn’t taking any chances after my cookies!) but sometimes they tended to stretch out of shape on the journey from cutter to tray! I didn’t make 60 – probably about 25-30 but that may be because of my love of raw cookie dough :D

Although they may not look it, the ones above were cooked for 10 minutes! My Mum and I were wary of over cooking them so I took them out after the suggested 10 minutes. However it was soon clear they were nowhere near done so they went back in and finished cooking so by the end they had been done for the maximum 15 minutes suggested.
I haven’t yet sandwiched them together with the buttercream as it was late and just as hot by the time I finished them yesterday and to be honest I doubt I will as I’m busy today and off to Spain tomorrow! They are pleasant on their own but I was disappointed with the coffee taste. When I had eaten the raw dough the coffee taste had been perfect and distinct. I was fully expecting a strong coffee cookie but during cooking the coffee seemed to have completely cooked out! Is this possible? So, in the end I ended up with some rather plain shortbready-cookies, quite sweet looking and nice tasting but not exactly what I had intended!


Little Mocha Kisses


Makes about 25 kisses (I got 25-30 biscuits just before sandwiching together!)

175g (6oz) self raising flour
75g (3oz) caster sugar
75g (3oz) butter
2tsp instant coffee powder or granules (could be increased but don’t be put off by the strong raw dough!)
1tsp hot water (I used 2tbsp)
1 egg
For the chocolate icing: 50g (2oz) softened butter
100g (4oz) icing sugar
3tsp cocoa powder

1. Preheat the oven to 180’C/350’F/Gas Mark 4.

2. Place the flour, butter and sugar in a food processor and whiz until the mixture resembles breadcrumbs.


3. In a cup of small bowl, mix the coffee with hot water, then add the egg and whisk to break up. Add this into the food processor and process until the dough comes together.

4. Freeze dough for 10 minutes.

5. Dust the work surface with icing sugar and then roll out the dough until it is 5mm (1/4 inch) thick and, using a small 4cm (1 ½ inch) long heart-shaped cutter, cut out 50-60 heart shapes.

6. Place them slightly apart on 2 baking trays (no need to grease) and bake in the oven for 10-15 minutes or until golden brown and slightly firm at the edges. Remove from the oven and carefully lift off the tray with a metal slice while they are still very hot to prevent them sticking. Allow to cool on a wire rack.

7. To make the chocolate icing – in a bowl using a wooden spoon (or in the food processor again) mix the soft butter, icing sugar an cocoa powder until it comes together. Use the icing to sandwich the cookies together. If you dip a table knife into hot water as you work, it helps the icing spread. Store in a box for 2-3 days.

Tomorrow morning I am going to Andalucia in Spain for 2 weeks so I wont be able to post. However, provided it works, I have scheduled a post for the Serious Ultimate Amazing Chocolate Brownies (my name!) so do check back! Hopefully when I get back I will be full of Spanish food and have lots of lovely pictures to share.

UPDATE UPDATE UPDATE

I gave in and made the icing!! But blogger is being funny so the pictures will be with the brownie post which hopefully will post itself (it is scheduled I am not just crazy!) on the 7th August!