Sometimes I feel I should rename this blog ‘An ode to lemons’. The last three cakes I’ve done on my blog have been variations of lemon cake. Mini Rhubarb Lemon Buttermilk Bundts, Blueberry and Lemon Drizzle Bundt, and now this Saffron and Lemon Syrup cake. Hopefully you won’t mind though, because this summery, sunshiney cake was too good not to share.
Sunday, 7 September 2014
Saffron and Lemon Syrup Cake


Sunday, 13 July 2014
Blueberry & Lemon Bundt Cake
I feel like as it is mid-July I should be blogging about ice cream, barbecues and gluts of summer fruit. But it appears the English weather is yet to get the ‘summer sunshine and warmth’ memo so I made a cake instead. My first bundt cake!

Friday, 30 May 2014
Mini Rhubarb Lemon Buttermilk Bundt Cakes
I have wanted a bundt tin for so long so I was very excited when I found a yellow silicone mini bundt tin in Lidl for just £2! I’m normally quite good at resisting tins and kitchenware that I know aren’t exactly vital to my collection, but this was too much of a bargain to resist. And I’m happy I didn’t because it gave me the excuse to make these tasty little rhubarb cakes. 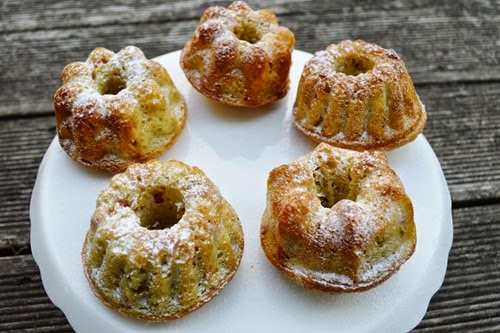

Ingredients: 175g caster sugar
200g rhubarb, halved lengthways then diced into 1cm pieces
1 lemon, zested
2 tbsp sunflower oil
1 egg
125ml buttermilk, or 125ml milk and 1tsp of lemon juice left to stand for 5mins
200g plain flour
1 tsp baking powder
1 tsp bicarbonate of soda
Method: 1. Heat oven to 180’C. Spray a mini bundt tin with cake release spray, or line a 12-hole muffin tin with paper cases.
2. Stir the sugar, lemon zest and rhubarb together and set aside.
3. Beat the oil, egg and buttermilk together. Pour onto the sugary rhubarb and stir until combined.
4. Now, add the flour, baking powder and bicarbonate of soda and stir until just evenly incorporated.
5. Quickly spoon into the cases, filling ¾ full. Bake for 15-18 mins until golden and springy to the touch. Cool on a wire rack and dust with icing sugar.
Saturday, 7 September 2013
Whole Lemon Bars


Friday, 30 August 2013
Lemon Drizzle Traybake
The picture below is only roughly half of this traybake. Sometimes you just need a hefty dose of cake. This lemon drizzle marks the third and final (for now!) podcast in the Lucy’s Recipes series, which you can listen to here. I think lemon drizzle cakes are one of those bakes that are always popular – they’re seen in tearooms and cafes across the country. They’re also easy to adapt to your own likes and needs – I’ve made loaf cakes, mini cakes, covered the whole top with icing, used a crunchy sugar syrup instead of icing, and used oranges or limes instead of lemon. The possibilities are endless! The recipe I used is below, adapted from a Donal Skehan recipe – enjoy!
225g caster sugar
225g butter
4 eggs
250g self raising flour
1tsp baking powder
3tbsps milk
zest of 3 lemons
150g icing sugar
juice of one lemon
1. Preheat the oven to 160’C. Cream the butter and sugar until really light and fluffy.
2. Gradually add in the eggs, mixing well in between each addition.
3. Grate in the lemon zest, then sift in the baking powder and flour.
4. Add the milk and fold gently until everything is evenly combined.
5. Pour the cake mixture into a lined rectangular baking tin (30x23cm) and cook for 30mins until golden and springy. Place on a wire rack to cool.
6. Combine the icing sugar and lemon juice into a smooth paste. Drizzle off the end of a spoon over the cooled cake in a large zig zag pattern. Enjoy!

Monday, 27 May 2013
Mini Lemon Cheesecakes
There are only four of us in my immediate family. My sister is away and my Mum doesn’t eat that many sweet things – so this leaves just me and my Dad to bake for. Whilst we wouldn’t exactly say no to eating layer cakes and batches of muffins and trays of scones, it’s hardly good for us and more often than not the food is no longer its freshest and best before we’ve had a chance to eat it and this waste is super annoying. It also limits my recipe choices: when I had some leftover cream cheese I knew immediately I wanted to make cheesecake but all the recipes I read were way out of my feasibility – calling for 700g of cream cheese, 400g of biscuits, finished bakes serving 12 etc. It was time to go it on my own!

Makes 3-4 mini cheesecakes
Ingredients: 50g butter
120g digestives
200g cream cheese
1tbsp creme fraiche
50g icing sugar
1 lemon, zest and juice
Method: 1. Heat the butter in the microwave until fully melted. Place the digestives in small plastic bag or bowl and use the end of a rolling pin to bash the biscuits to crumbs. Tip the biscuits into the melted butter and stir until fully combined then press a few teaspoons of crumbs into the base of each food ring.
2. Combine the cream cheese, crème fraiche, icing sugar and lemon zest and juice all together in a bowl until smooth. Taste and tweak if you like – the exact quantities do not matter too much in this recipe, so feel free to add more sugar for more sweetness or some more lemon for a sharper cheesecake etc.
3. Spoon the cheesecake mixture between the food rings, pressing the mixture down and levelling the top to prevent air bubbles forming. Cover with clingfilm and refrigerate for 3-4 hours until firm.
4. To remove the cheesecake from the ring, I just warmed them slightly with my hands and ran a knife round the edge and then gently pulled the ring up and off. Zest a little more lemon over the top of the cheesecakes if you wish and enjoy!

Monday, 4 March 2013
Mini Lemon Drizzle Cakes
I think it’s amazing the amount of random kitchen equipment you can get nowadays, Lakeland catalogues in particular are brilliant to introducing you to all sorts of things you never realised you needed – it has 15 different tin openers, a 3-in-1 avocado tool, banana holders and much, much more. It can get pretty dangerous for the bank balance! I’m pretty restrained though, my least used pieces of kitchen equipment are probably the deep fat fryer I’m slightly scared of (for both calorie and fire issues!) or the slightly fiddly doughnut maker, which I should really use more. Another underused piece is a tin from Williams-Sonoma that makes very pretty mini flower-shaped cakes, which I have avoided due to its intricacy and obvious issue of getting the delicate cakes out whole! 


Mini Lemon Drizzle Cakes, adapted from The Big Book of 365 Cakes and Cookies by Hannah Miles
Makes around 40mini cakes (sounds like loads but remember they’re tiny!) or one 20cm/8in large cake
225g softened butter
225g caster sugar
4 large eggs, beaten
225g self raising flour
2tbsps milk
3 lemons, juiced and zested
2tbsps icing sugar
1. Preheat the oven to 180’C/350’F. Spray your mini muffin tins or a 20cm springform cake tin.
2. Beat the butter and sugar until light and fluffy. Add the eggs gradually, beating well after each addition. Add the flour, lemon zest and juice of 1 lemon and fold into the mixture.
3. Fill the mini tins 3/4 fill and bake for 10 minutes, until golden and springing back. If doing one large cake, bake for 25-30 minutes. Turn the cakes out onto a wire rack.
4. Heat the icing sugar and remaining lemon juice in a small saucepan until the sugar has dissolved, then boil for 1 minute to create a syrup. Spoon over the cakes whilst still hot, repeating until all the syrup is used up.

Monday, 26 March 2012
Mini Bakewell Tarts
 I saw these on Jo’s lovely What do you make of my cake? blog, and was severely tempted straight away. I can’t believe I managed to wait so long before making them myself! They look so dainty and cute and very much reminded me of a bake suitable for Red Nose Day or Comic Relief with their bright red cherry. I love bakewell tarts, having made a whole one before, and also tried the Mr Kipling ones but I knew these would be so much better. As I’ve shown previously, shop bought baked goods often contain all sorts of crazy ingredients and the Mr Kipling Mini Bakewell Tarts (which look pretty much identical to mine) are no different, with over 30 ingredients…
Really, these Mini Bakewell Tarts are not that hard to make and you can be safe in the knowledge that all ingredients are pronounceable. Also, seeing as you’ve gone to the trouble of making them yourself you definitely deserve more than one :) You can find Jo’s original post with the recipe here – definitely give them a try. Even though they aren’t tiny and are quite sweet, I still found these quite addictive – enjoy!

Monday, 19 March 2012
After 10 Chocolates

 You can either go Russian Roulette with your chocolate – break it all into shards and jumble them up so nobody knows what flavour they’ll get, or keep all your flavours separate. It is so much fun to make – especially when you’re mixing up the sugars and your kitchen suddenly feels like a science laboratory. Favourite flavours in my family were the rose (although be careful not to add too much as it can become overpowering and taste like strong Turkish delight) and the surprise hit – coffee granules. I think this would be a fun, different talking point at a dinner party instead of normal shop bought mints especially as its so easy to do. You can find Jamie’s proper recipe here, enjoy!
Wednesday, 2 November 2011
Love Bakery Book Review
I was recently lucky enough to be sent another book by Ivy Press – this one was Love Bakery by Samantha Blears. Love Bakery is an actual bakery on the Kings Road, London so the book gives recipes for a few of their favourite top sellers and lots of other inventive ideas. It’s a beautifully laid out book – full page photos for each recipe, lots of colour, detail and a little background writing accompanying each recipe. 


Sunday, 10 April 2011
Passion Fruit Curd Tart
Never let it be said that baking is a stress-free hobby. Passion fruit curd making is distinctly stressful. For nearly five minutes you stand whisking a bright orange watery liquid on an almost negligible heat, so you turn it up just a smidge, then all of a sudden the colour changes to sunny yellow, the curd thickens rapidly and you’re terrified your curd is curdled and your sore hand from 30+ minutes of squeezing and straining passion fruits will all have been in vain. Pheeew.


Sunday, 23 May 2010
Blueberry Lemon Loaf
 Especially this cake. Taking advantage of fresh summer blueberries, with a backdrop of lemon to add zing. Super sweet lemon icing drizzled over the top, the crackly sugar topping peaking through. Gorgeous!
  Making this cake feels like making one huge blueberry muffin because its the same technique – mixing the wet ingredients (buttermilk, butter, eggs, lemon) into the dry (flour, sugar, berries) and then taking huge-nervous care not to over mix. It was super easy to make and the only hard part is waiting whilst it cooks and cools. This cake ended up being a family effort: I mixed, my sister poured it into the tin, my Mum cut us all hearty slices and my Dad unknowingly ate the slice that had fallen on the floor… :)
 A slice of this purple-studded beauty was just the ticket after spending too long in the sun and coming in just a tad too pink rather than the intended glowing tan… Find the recipe here, make one of the last big cakes for a while, and eat with pleasure!
Monday, 3 May 2010
Lemon Cream Fruit Tarts
The English May Bank Holiday has just been and, true to form, it rained. Although the day is truly meant to symbolise the coming of summer, the day just caused cravings for the sticky winter food I was just beginning to leave behind. So with my Granny coming for the day the first idea was to make a simple cake. But having just made the carrot cake I really wanted to welcome summer by making something light, zingy, fresh and bright. Which is just what I got from these delectable little tarts. 


- 100g plain flour
- 50g caster sugar
- 100g butter
- 50g semolina or cornflour
1. Set the oven to 160C/gas 2.
2. Place all the ingredients together in a food processor and whizz until the mixture forms a smooth dough (if preferred this can be done by hand in a bowl using soft butter).
3. Roll out the dough to 5mm thickness and cut circles out with a cutter. Place gently in a bun tin. 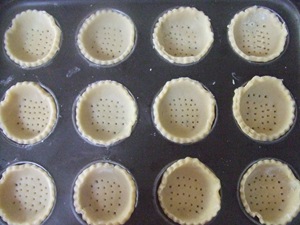
5. Set aside to cool a little and slide out of tin onto a wire rack to cool before filling. Only fill when you are ready to eat!
Tuesday, 27 October 2009
Passion-fruit and Lemon Cheesecake
 Why such a mighty fine cheesecake? Lets go through. Crumbly, buttery biscuit base: classic good cheesecake. Thick, rich, creamy middle with very strong lemon “tang”. All topped off with big tropical flavour from juicy fresh passion-fruit. Plus the best bit: So Very Simple To Make!
 The recipe was sent to me from my Mum, and she found it on the Carnation Nestle website. Celebrity chef Phil Vickery has created loads and loads of recipes using all the Nestle products (condensed milk and soft caramel) and not only put all the recipes on the website, but also turned loads of them into “Pudcasts“ (videos of him making the creations): my new favourite thing. Its amazing the variety of dishes he’s thought up using these ingredients: from cookies and truffles to sundaes and mini treats to pies and tarts. And this lovely cheesecake!
The clever thing Phil Vickery discovered is that when condensed milk reacts with lemon juice, the mixture thickens dramatically. That's how this cheesecake is so simple: you don’t need to bake it or add gelatine to thicken it, the reaction has already occurred when you mix the lemon juice into the mascarpone and condensed milk mix. After a few hours in the fridge: voila! Creamy gorgeousness at your service. Then its just a simple matter of spooning over the passion-fruit. However, in the original recipe, Phil fills the cheesecake with a blueberry compote, something I chose to leave out. I thought it might overpower the passion-fruit, so I added the juice and zest of a couple of extra lemons so that there were complimenting bright flavours rather than overpowering ones. Also, the original recipe states to use 4 passion-fruit, but to get a decent covering like I had below I used 6. If anyone tries it with the blueberry, then do tell me how it went! You can find the recipe (and have a happy time browsing all the others) here. I personally have my eye on the Millionaire’s Shortbread….Enjoy!

Monday, 12 October 2009
Lemon Loveliness
There are a lot of times in winter, like I touched on a while ago, when I crave warm comforting dinners. A bowl of stew or fat “wodge” of crumble is always going to make a chilly night all cosy and delicious! But as you leave autumn and edge towards winter, there are times when I also crave something light, refreshing and zingy: just to wake me out of the dark winter stupor. This little dessert does just that…


Ooh, I do like a little bit of lemon! In fact, lemon is the second most popular flavour of things I have baked on this blog, just behind chocolate. Can’t go wrong with a bit of citrus :) Although saying that, this mousse didn’t turn out quite as delicious as hoped. The comments on it were, “a bit too sweet” and “slightly curdled tasting” – not perfect but sadly true! I can’t pinpoint exactly where or why this mousse turned out wrong, but there was just something wrong! It didn’t have the texture of lovely smooth tangy mousse, just very fluffy and eggy. I’ve given the recipe at the bottom anyway as maybe some people like their mousse like that (?) or maybe one clever blogger knows why it wasn’t good. Thankfully, the madeleines were a different story!


Both the mousse and the madeleines were from the most gorgeous book – Bills Food by Bill Granger. I so recommend this book. The photos are stunning, and most pages in here just make you want to move to sunny Australia! Plus, the recipes aren’t half bad – another one from this book coming up shortly! I’ve given the recipe for both the mousse and madeleines, but I honestly would not give the mousse a go :S !


Monday, 6 July 2009
Crunchy Lemon Pie?
There are so many different places to get great ideas and recipes from today. Previous generations may have had family recipes and a few cookbooks. Then came the rise of the celebrity chef – and Nigella, Jamie, Gordon et al gave us hundreds of new recipes promising to make us look like culinary gods/goddesses. Then they were TV programmes – who could resist some sumptuous fish recipe after it was shown to them by Rick Stein as he sailed through various parts of Europe/the Mediterranean cooking and eating all sots of delicacies.
Now we also have a huge variety of magazines and “Food Sections” in the papers ever month or week – providing us with more inspiration. And so the Saturday Times Weekend Section recently combined two recipe sources: by showing a readers family recipe in the food-section each week – therefore family secrets available for the nation (like blogs..?). And hence where this weeks recipe was from!


