Showing posts with label holiday inspired. Show all posts
Sunday, 13 June 2010
Rosemary and Olive Oil Focaccia
Recently, my message was opinions can change. Today, my message is much more basic but just as important: Always Read The Recipe Thoroughly.
Unlike when I first made cinnamon rolls and thought the dough was so lovely and easy to work with. Turned out I’d forgotten the egg. Or when my friend E made gingerbread men and simply forgot to add the flour. And definitely not like today, when I didn’t read to add most of the water to my dough and simply poured it all in nicely, before adding an extra two tablespoons of olive oil. Smooth.
This not-so-clever mistake then led to fifteen minutes of kneading and liberal additions of flour every now and then. Gradually, slowly, my sticky determined-to-get-everywhere dough morphed into a smooth, calm and elastic dough ball.
Then it was ready to get to a warm place, rise, be taken out, stretched out onto a tray, doused liberally in olive oil and salt and set back to its warm place. After a sprinkle of chopped rosemary and twenty minutes in the oven, everything was ready. The family settled down to watch Great British Menu, everybody with a generous square of bread on their plate. Crunchy on top, soft and chewy within. Scented and flavoured with olive oil, salt and rosemary – simple but classic. I think this may be one of my favourite things I have made, simply because I couldn’t stop eating it! Find the recipe here, (the dough recipe is linked to on the page as Classic White Loaf) and my only adaption of course was to leave out the red onions. Enjoy!
Monday, 18 January 2010
Glazed Fruit Rolls
I read somewhere once that things are only scary if you are told they are. For instance, many people find pastry making scary – but if you grow up believing its simple then you are oblivious to the fear. It’s the same with making a sponge or meringue – feared processes, but if you tell yourself they are simple then they are likely to be much easier. My baking fear is yeast.
About a year ago, I attempted hot cross buns. They didn’t work, and there was much wasted dough – not fun times. Since that, I occasionally saw a recipe I liked, considered making it, saw it involved yeast, and put straight back down. The kneading, the knocking back, the rising, the “tepid” water, the whole shebang scared me. But then time and time again on Tastespotting, Foodgawker and on so many blogs I would see cinnamon rolls. And they looked so very good. SO very good. So I gave in, and yeast was once again introduced to my mixing bowl.
These aren’t actually cinnamon rolls – they are mincemeat rolls. After Christmas there are always a few jars left over and whilst mincemeat lasts, its nice to use it up a bit. A free day was found and the baking begun. And it worked! This recipe was from the Waitrose magazine, so from the beginning I felt in safe “hands”. The dough came together nicely, wasn’t too sticky, rose when it was meant to – it was on its best behaviour! And happily, I managed to cut 10 rather than 8 rolls out of the dough.
These may be one of the best-smelling things you could bake. They fill your house with their rich, fruity “aromas” and the softly baking dough. As you pull them apart, they open stickily and icing cracks and falls (I cut a final corner by making glace rather than cream cheese icing), your fingers immersed in each bite. Such a treat. They are perfect on a Sunday night in front of the television and our family demolished as many as we could fast. I’m happy to say this has set me back on the yeasty-route and massively helped with my confidence. Do not be surprised to see Hot Cross Bun Attempt 2 in this space at Easter time! You can find the fruit scroll recipe here. Enjoy!
Posted by
Lucy
at
8:29 pm
Labels:
cinnamon,
fruit,
holiday inspired,
icing,
little cakes,
mincemeat,
yeast
Sunday, 15 February 2009
Valentine’s Day Hearts
Yesterday, of course, was Valentine’s Day! Lots of love all over the country, and lots of red and pink heart-shaped foods!
Valentines Day originates from the Roman times, when the Roman Emperor Claudius II was having trouble getting men to join his army, because the men didn’t want to leave their girlfriends or wives. Aww :) So the Emperor broke and forbid all marriages. The priest Valentine secretly married people in secret, and when the Emperor found out he killed Valentine – and so he became a saint! (That is a very cut down version of the story learnt from Fridays assembly, there are lots of other beliefs too)
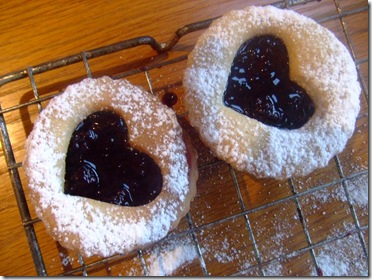
Of course I too made a heart-shaped food for the occasion, and knowing me, I made heart cookies :). They are from 30 Brilliant Baking Recipes, which is a small book that came from Olive Magazine – and a book I have not baked from before! Olive is a great magazine for all foodie-lovers, it is one of the places I would love to work at when I’m older! They often give out these little books with the magazine. There has been 30 Comfort Foods, 30 World Recipes, 30 French Classics, etc ! In the book, the cookies have small circles cut from the middle, but I did hearts for Valentines Day.
They are very simple and easy to make although the recipe makes a lot so you have to do a lot of batches! It is best to use a smooth jam, without lots of big lumps of fruit. Unlike me, who used blackberry jam with a couple of whole blackberries in so the biscuits were a bit wobbly…but still yummy! The smoothness just helps the biscuits stick together a bit flatter – if that makes sense! So now I have made my own digestives, my own sort-of-jammy-dodgers today, what’s next – custard creams? Hehe :)
Hope you all had a lovely Valentines!
Jammy Biscuits, from 30 Brilliant Baking Recipes
Makes 20
225g unsalted butter
150g golden caster sugar
1tsp vanilla extract
3 beaten egg yolks
250g plain flour
110g ground almonds
thin jam for spreading – flavour of your choice
icing sugar to dust
1. Beat the butter and caster sugar together until pale and fluffy. Add the vanilla and egg yolks and mix thoroughly. Gradually add the flour and ground almonds.
2. Lightly knead the mixture until it comes together in a ball. Wrap and chill for 1hour.
3. Heat the oven to 170’C/fan 150’C/gas 5. Roll the dough out to the thickness of £1 coin on a lightly floured surface and stamp out biscuits using a 6-7cm cutter.
3. Reshape leftover dough into a ball, re-roll and cut out more biscuits. Stamp out a small circle/heart from the middles of half the biscuits.
4. Put the biscuits on lined baking sheets and bake for 12-15minutes or until golden. Rest for a minute then transfer to a wire rack.
5. When completely cold, spread the whole biscuits with jam. Dust the ring-shaped biscuits with icing sugar. Put a sugar dusted ring on top of a jam covered biscuit and press lightly together.
Valentines Day originates from the Roman times, when the Roman Emperor Claudius II was having trouble getting men to join his army, because the men didn’t want to leave their girlfriends or wives. Aww :) So the Emperor broke and forbid all marriages. The priest Valentine secretly married people in secret, and when the Emperor found out he killed Valentine – and so he became a saint! (That is a very cut down version of the story learnt from Fridays assembly, there are lots of other beliefs too)
Of course I too made a heart-shaped food for the occasion, and knowing me, I made heart cookies :). They are from 30 Brilliant Baking Recipes, which is a small book that came from Olive Magazine – and a book I have not baked from before! Olive is a great magazine for all foodie-lovers, it is one of the places I would love to work at when I’m older! They often give out these little books with the magazine. There has been 30 Comfort Foods, 30 World Recipes, 30 French Classics, etc ! In the book, the cookies have small circles cut from the middle, but I did hearts for Valentines Day.
They are very simple and easy to make although the recipe makes a lot so you have to do a lot of batches! It is best to use a smooth jam, without lots of big lumps of fruit. Unlike me, who used blackberry jam with a couple of whole blackberries in so the biscuits were a bit wobbly…but still yummy! The smoothness just helps the biscuits stick together a bit flatter – if that makes sense! So now I have made my own digestives, my own sort-of-jammy-dodgers today, what’s next – custard creams? Hehe :)
Hope you all had a lovely Valentines!
Jammy Biscuits, from 30 Brilliant Baking Recipes
Makes 20
225g unsalted butter
150g golden caster sugar
1tsp vanilla extract
3 beaten egg yolks
250g plain flour
110g ground almonds
thin jam for spreading – flavour of your choice
icing sugar to dust
1. Beat the butter and caster sugar together until pale and fluffy. Add the vanilla and egg yolks and mix thoroughly. Gradually add the flour and ground almonds.
2. Lightly knead the mixture until it comes together in a ball. Wrap and chill for 1hour.
3. Heat the oven to 170’C/fan 150’C/gas 5. Roll the dough out to the thickness of £1 coin on a lightly floured surface and stamp out biscuits using a 6-7cm cutter.
3. Reshape leftover dough into a ball, re-roll and cut out more biscuits. Stamp out a small circle/heart from the middles of half the biscuits.
4. Put the biscuits on lined baking sheets and bake for 12-15minutes or until golden. Rest for a minute then transfer to a wire rack.
5. When completely cold, spread the whole biscuits with jam. Dust the ring-shaped biscuits with icing sugar. Put a sugar dusted ring on top of a jam covered biscuit and press lightly together.
Tuesday, 21 October 2008
Digestive Biscuits
Recently my parents went to stay in a beautiful hotel (Le Manoir de Raynaudes) in the tarn region of South-West FranceThey had a lovely time and brought back lots of presents! First up, for me and my sister, some very pretty and totally French chocolate baguettes :) 
They also bought home two bags of crackly, nutty, almond tuile biscuits which my Mum adores and were greatly appreciated at my Dad’s work!
Finally, Mummy took her book that Orlando Murrin (the owner of the hotel) has written all the way to France. It is full of recipes for the food that Orlando serves at the hotel. He signed it too!
It is a beautiful book and my parents had a lovely long weekend there. Because they had such a nice time and they told me how good the food was, I decided to recreate some of the yummy food they had had over there back in rainy England...no easy task! They had told me about some delicious digestive biscuits they had been given and as the recipe was in the book, and I adore digestives I chose to give these a go.
Sure enough, they were truly scrumptious! Nutty from the oatmeal, crunchy round the edges and softer in the middle. I like these because they could be used either truly savoury for a cheeseboard, or sweeter by being dipped in chocolate for homemade chocolate digestives!
Home-made digestives, from A Table In The Tarn by Orlando Murrin
100 medium oatmeal or rolled oats
100g wholemeal flour
45g brow sugar
75g butter
½ tsp bicarbonate of soda
3-4tbsp milk
squeeze of lemon juice

Here is the recipe – try them and see what you can do! Also, buy the book as there are lots more yummy things in it – I would like to try the mint truffles next :)
Home-made digestives, from A Table In The Tarn by Orlando Murrin
Makes 15-30, depending on size
100 medium oatmeal or rolled oats
100g wholemeal flour
45g brow sugar
75g butter
½ tsp bicarbonate of soda
3-4tbsp milk
squeeze of lemon juice
1. Process the first 3 ingredients until well combined.
(Oatmeal, brown sugar, wholemeal flour)

1. Add the butter, bicarb and salt, then most of the milk and lemon juice. Whizz until the mixture comes together, adding the remaining milk if necessary. The dough will be slightly tacky.
2. Roll out on a floured surface to biscuit thickness and stamp out rounds of whatever size you fancy. Making them small and elegant is harder work than making large ones. Prick once or twice decoratively with a fork.
3. Bake at 200’C (190’Fan) for 10-12 minutes, till just starting to go brown at the edges, not all over. Smaller ones might take less time.
2. Roll out on a floured surface to biscuit thickness and stamp out rounds of whatever size you fancy. Making them small and elegant is harder work than making large ones. Prick once or twice decoratively with a fork.
3. Bake at 200’C (190’Fan) for 10-12 minutes, till just starting to go brown at the edges, not all over. Smaller ones might take less time.
Veryy yummy! Oh, whilst researching for a fun topic for me and Chloe to do as a form assembly, I stumbled upon a great website with a National Food Day for every single day of the year, as well as Food Weeks and months. Every time I post I shall update you on that days day (if you are still following!) although I warn you some are extremely random! Today, October 21st, is Apple Day and National Pumpkin Cheesecake Day! October is the month of many random foods, including National Cookie Month – very appropriate considering my last post! Also, this week is Chicken Soup for the Soul Week!
Wednesday, 30 July 2008
Cakes from Wales...
Yesterday I finally had the chance to bake in our new, extended and refurbished kitchen (and our new range cookeer/oven with shiny chef top!). Although it is still not quite finished so I was working on cardboard worktops, and I had no weights for my scales - the multitude of lovely fluffy cakes I served up at the end made it all worth it!
We have gone to the same cottage in the Pembrokeshire area of Wales for two years now - both times at Easter. We have great times there (I went for my first proper bicycle ride there - I didn't learn until I was 12) but how does that link to these cakes? Both times we have holidayed there we have arrived very late at night, exhausted and grumpy after the long 6-7 hour drive from London. We would arrive and in the kitchen spy a huge tin filled to the brim of freshly home-baked Welsh cakes. It was the best greeting! They were crumbly and light - perfect with a smear of butter. They cheer us up before we head off to bed and you can bet they won't last longer than 3 days within our family!
After we got back this year, relaxed and rested, I knew I wanted to recreate these little scones in our own kitchen. Unfortunately I never got round to it before the building work started but yesterday, with no builders around, me already bored in my summer holidays and desperate to get back to cooking after 3 months of no kitchen and ready meals :( - I searched for a recipe, went out for the ingredients and got mixing!
There were 3 in a row and the little one said..yum yum!
The Mary Berry recipe I used was very easy to follow and quick and simple to make up. I enjoyed making them because the steps were easy and all they needed was a bit of a stir together! For rolling them out we have lost our rolling pin so i just flattened the dough out with my hands but I am sure none of you have that problem! I had trouble making the dough an even thickness, though, so when cooking they were done at various times. The ones in the middle of the chef top cooked a lot quicker than the edges so I shall bear that in mind and try to squeeze a few more near the centre as they do not spread at all. These would be a good go-to recipe if someone comes to visit at short notice and you want to serve them something scrummy, as they look like they may be more complicated than they actually are!
I did make a few alterations which I think really helped them and if I make them again I might experiment more. A touch of orange juice or zest, variations on the fruit - perhaps cherries and sultanas, or dried cranberries, maybe some more spice or for a more decadent treat even some chopped chocolate!
Here's the recipe, with my alterations in pink!!
Welsh Cakes from Mary Berry's Complete Cook Book, by Mary Berry
Makes 12 (I forgot to count but I know the recipe made a lot more than 12, probably 20)
250g (8oz) self raising flour
1tsp baking powder
125g (4oz) butter
90g (3oz) caster sugar (when I put this amount in, it disappeared into the batter immediately so I put in another tbsp :P)
90g (3oz) currants(similar situation as with the sugar, I didnt weigh an amount just put in another 3-4 tbsp of currants until they were evenly distributed)
1/2 tsp ground mixed spice (I spilled a bit extra to make it up to 3/4 tsp but my tasters suggested it needed still more)
1 egg, beaten (so i forgot to beat it..it didnt make the slightest difference!)
about 2tbsp milk (Mary suggests this as a maximum, but to combine the mixture I used 4tbsp! this is probably due to the extra currants and sugar)
sunflower oil, for greasing (forgot to use! not sure it was neccessary?)
7cm (3in) pastry cutter (as I could not find my cutters, I simply trimmed my dough into long rectangles and cut triangles)
1. Sift the flour and baking powder into a large bowl. Add the butter and rub in with your fingertips until the mixture resembles fine breadcrumbs.
2. Add the sugar, currants and mixed spice, and stir to mix. Add the egg and enough milk to form a soft but not sticky dough.
3. On a lightly floured work surface, roll out the dough to a thickness of 5mm. Cut into rounds with a pastry cutter (or triangles with a sharp knife) .
4. Heat a griddle or a heavy frying pan and grease with a little oil. Cook the Welsh cakes on the hot griddle or pan over a low heat for about 3 minutes on each side until cooked through and golden brown. (really do make sure your cakes are on a LOW heat as our first batch cooked very quickly on the outside but were still a bit raw on the inside)
5. Leave to cool on a wire rack. Serve on the day of making, if possible.

Welsh Cakes from Mary Berry's Complete Cook Book, by Mary Berry
Makes 12 (I forgot to count but I know the recipe made a lot more than 12, probably 20)
250g (8oz) self raising flour
1tsp baking powder
125g (4oz) butter
90g (3oz) caster sugar (when I put this amount in, it disappeared into the batter immediately so I put in another tbsp :P)
90g (3oz) currants(similar situation as with the sugar, I didnt weigh an amount just put in another 3-4 tbsp of currants until they were evenly distributed)
1/2 tsp ground mixed spice (I spilled a bit extra to make it up to 3/4 tsp but my tasters suggested it needed still more)
1 egg, beaten (so i forgot to beat it..it didnt make the slightest difference!)
about 2tbsp milk (Mary suggests this as a maximum, but to combine the mixture I used 4tbsp! this is probably due to the extra currants and sugar)
sunflower oil, for greasing (forgot to use! not sure it was neccessary?)
7cm (3in) pastry cutter (as I could not find my cutters, I simply trimmed my dough into long rectangles and cut triangles)
1. Sift the flour and baking powder into a large bowl. Add the butter and rub in with your fingertips until the mixture resembles fine breadcrumbs.
2. Add the sugar, currants and mixed spice, and stir to mix. Add the egg and enough milk to form a soft but not sticky dough.
3. On a lightly floured work surface, roll out the dough to a thickness of 5mm. Cut into rounds with a pastry cutter (or triangles with a sharp knife) .
4. Heat a griddle or a heavy frying pan and grease with a little oil. Cook the Welsh cakes on the hot griddle or pan over a low heat for about 3 minutes on each side until cooked through and golden brown. (really do make sure your cakes are on a LOW heat as our first batch cooked very quickly on the outside but were still a bit raw on the inside)
5. Leave to cool on a wire rack. Serve on the day of making, if possible.
Verdict? The Welsh Cakes were scrumptious, crumbly and light just like the proper Welsh ones. Plus - they have all disappeared now so something must be right! Also, the chef top made me and my Mum feel like professionals and the kitchen was a delight to work in! I will definitely make again. Come back tomorrow for chocolate chip cookies (as my sister requested!)
Subscribe to:
Posts (Atom)