Showing posts with label white chocolate. Show all posts

Monday, 12 August 2013

White Chocolate & Raspberry Dipped Cookies

You might remember back in May I told you I had been interviewed all about this blog and baking for a podcast on Podium.me. Well, today is the start of a new 3-part podcast series with me over on Podium, called ‘Lucy’s Recipes’ where I bake and chat through a different recipe each week. I am super excited about it, I really enjoyed recording it and it was a really fun new challenge. These white chocolate and raspberry cookies are the first recipe in the series and were a big hit in my house!DSC_0102As well as talking through the recipe for these cookies on this weeks podcast, I also chat about my future plans now that I have finished school. I haven’t mentioned them on here before as I was waiting until everything was confirmed and I had solid plans to announce. But since exams results day was yesterday here in the UK I can finally be sure of exactly what I’m doing for the next four years. At the start of October, I am starting cookery school! I know it will be a massive challenge going from a fairly relaxed Sixth Form schedule at school to an intense year of learning everything there is to know about food but I am so excited! In case you are interested, I will be doing this Leiths Professional Diploma for a year. After that, I will be starting a History degree at Cambridge in October 2014. This blog will of course keep going and I’m hoping to be able to write posts about my time at Leiths and updates on cookery school as well as my normal content, if people would be interested? Now, back to the cookies!DSC_0145This is my fourth white chocolate cookie on my blog and they are always super popular but I wanted to do something slightly different with this version. I adapted a Dorie Greenspan sable recipe, meaning that the cookies are super sandy and buttery. This was the first time I have used freeze dried raspberries and I really liked them – they are super pretty and their burst of intense raspberry flavour helps cut through the richness of the thick layer of white chocolate! At first, I wasn’t sure if these cookies would be too rich but judging by the speed at which the cookie tin emptied I think we managed! You can find the recipe below, and head over to the podcast here to listen to me chat through the recipe and discuss cookery school a bit more. I hope you enjoy!DSC_0143
White Chocolate and Raspberry Dipped Cookies
Ingredients: 225g butter
1/2 cup caster sugar
1/2 cup icing sugar
1/2 tsp salt
2 egg yolks
2 cups plain flour
250g white chocolate, chopped into small chunks freeze dried raspberries
1. Cream the butter and sugars in a stand mixer or with a wooden spoon until really light and fluffy.
2. Add the yolks and salt and mix until combined.
3. Pour in the flour and 100g of the white chocolate and stir until the dough comes together and looks uniform.
4. Shape the dough into a log and wrap in clingfilm and chill for at least 3 hours.
5. Preheat the oven to 180’C. Unwrap your log of cookie dough and slice into 1cm thick cookies. Place on a lined baking tray, leaving 1inch between them.
6. Bake for 15minutes until golden, then let cool.
7. Melt the remaining white chocolate in the microwave (stirring every 30seconds) or in a bowl over a saucepan of simmering water.
8. Dip the cookies halfway into the white chocolate and place on parchment paper. Sprinkle some freeze dried raspberries over the white chocolate and leave to set. Enjoy!

Tuesday, 26 March 2013

Custard and White Chocolate Cookies

These cookies came about because of two previous recipes I’ve blogged:
1)
 These white chocolate cookies which are the biggest hit on my blog. I was surprised, because whilst I remember the cookies and they were delicious, it’s still a pretty unassuming recipe.
2)
These custard creams adapted from a Marcus Wareing recipe. I really enjoy doing biscuit challenge posts and so there was quite a lot of pressure when I tried making these as they are my favourite shop-bought biscuit. The results were also a hit.

Therefore, when I saw this recipe for Custard and White Chocolate Biscuits, combining the best of both recipes, I knew I had to give them a try! DSCF9394The result did not disappoint! They have a surprisingly large amount of custard powder in them, which gave the cookies quite a sandy texture and also a slightly orange tone. The amount of white chocolate didn't seem generous in the recipe but I think suited it well because otherwise, combined with the custard powder, they would be too sweet. I think they were nicest straight out of the oven when they were still soft in the middle and the chocolate was melting, as the biscuits became quite solid after a few days. This didn’t stop them being moreish though, particularly as I made them fairly small meaning the recipe made a large batch! They went down a treat with my friends too, despite already having had a bowl of tomato soup, ramekin of jelly and slice of pie each!

You can find the recipe here – enjoy!

DSCF9393

Monday, 11 March 2013

White Chocolate Pannacotta with Roasted Rhubarb

I love rhubarb, and I’ve noticed that I often seem to pair it with similar flavours. The early season forced rhubarb has such a shocking pink colour and distinctive tart taste that I serve it with creamy, white and almost blander flavours to let the rhubarb shine. One of my favourite dishes I’ve ever blogged was this Rhubarb Tart from Mother’s Day last year and with its rich cream cheese filling it is a prime example of my way with rhubarb. Similarly with the rhubarb custard tart where the baked vanilla filling contrasted nicely with the bold rhubarb. So when I had a lot of rhubarb that needed using up I made one unusual recipe I have to blog in the coming weeks, but used the rest in roasted rhubarb with white chocolate panna cotta. Well, who am I to break with such good flavour combinations?DSCF9374This time I opted to make my creamy background flavour a little bit more interesting and created a white chocolate pannacotta instead of just vanilla. I liked the result – it definitely felt rich and indulgent and had a really nice smooth texture despite the quite large amount gelatine. It also lasted for a week in the fridge so it was nice to have it always ready as a quick treat! White chocolate is a tricky flavour to make truly shine and I think in this case it would be more an issue of noticing if it wasn’t there rather than directly being able to pinpoint that the sweetness coming from chocolate. DSCF9382On their own the pannacottas were possibly a little bit too decadent, and I think they need an accompaniment to keep them interesting – another roasted fruit such as plums or fresh raspberries I’m sure would work well too. However I loved the rhubarb and found it the perfect thing to go alongside the pannacotta and delicious to eat just on its own as well. Enjoy!

White Chocolate Pannacotta with Roasted Rhubarb
Serves 5

Pannacotta: 500ml/18fl oz double cream
150ml/5½fl oz
milk
100g/3½oz white chocolate, broken into pieces
25g/1oz sugar
4 Dr. Oetker gelatine sheets, soaked for 5-10 minutes in warm water, then squeezed dry

Roasted Rhubarb: 250g rhubarb, cut into even pieces
1 orange, zest and juice
5tbsp golden caster sugar

  1. Heat the cream and milk in a saucepan over a medium heat until simmering.

  2. Reduce the heat to low and stir in the white chocolate and sugar until the ingredients have melted and the mixture is well combined.

  3. Remove the pan from the heat and add the gelatine leaves. Stir until the gelatine leaves have melted then set the mixture aside until it has completely cooled.

  4. Pour the pannacotta mixture into ramekins, then chill in the fridge for five hours, or until set firm.

  5. Meanwhile, tip the rhubarb into a tin so that they are in a single but snug layer (I used a 22cm square tin). Add the zest and juice of the orange and the sugar. Stir together to coat the rhubarb, then cover with foil and roast at 180’C for 15mins until tender but still holding its shape.

  6. To serve, dip the ramekin bases and sides in warm water to loosen the pannacotta from the moulds. Turn out one pannacotta into the centre of each of plate and serve the rhubarb alongside.DSCF9370

Friday, 31 August 2012

Chocolate Owl Cake

My Mum is really good at birthday cakes. When I was little I had an ice cream cake, treasure chest cake, my name written in Smarties, a teddy bear, a princess cake and more over the years. So for her birthday this year, it was time to return the favour! She requested this owl cake, purely for its cuteness, and my sister and I obliged.It took us a couple of read-through’s of the recipe to fully understand how the cake gets carved up into the adorable owl shape, and I may or may not have cut it wrong initially but that’s nothing a bit of chocolate buttercream gluing couldn’t save! It’s actually not too complicated to make, with a round sponge making the main body of the owl and then a square cake carved up for the rest.

It was really fun to do something different and it felt pretty indulgent – chocolate cake, chocolate buttercream, marzipan, white chocolate buttons, milk chocolate buttons, Cadbury Flake’s and chocolate fingers all together, but hey, when better to indulge then a birthday? Especially when the result is this adorable. I don’t have any pictures of the inside of the cake as it felt a little morbid and also we didn’t use the original recipe. The suggested cake was made with melted chocolate and we wanted it to be a little bit lighter so used the chocolate version of this. The cake was huge when finished, and lasted a good few days, but happily it stayed moist even after being cut into lots of pieces. The link for the original instructions (with helpful step by step photos of the cake carving) is hereenjoy!!

Saturday, 28 July 2012

Triple Chocolate Cookies

My friends always complain that I hardly ever bake for them. If they come round to my house they know I’ll definitely bake something for them, but I hardly ever take bakes into school. Even on birthdays it tends to be someone else who brings the cake in. I’m not sure why – I think it’s the pressure? And all the different tastes, likes and allergies to bear in mind! With my four week internship this summer, I wanted this to be different and so every Friday I’ve taken something in for the office. Blueberry and lemon cupcakes one week, nectarine and coconut muffins last week, and these triple chocolate cookies the week in between. There is definitely less pressure and fear that people won’t like something when it involves chocolate!DSCF9085The original recipe is from Dan Lepard’s Short and Sweet book, a fabulous book and one where my list of ‘To Make’ recipes is pretty much the whole book. I feel like I can trust Dan Lepard’s recipes too – I’ve made many of his ones from the Guardian and they’ve always gone down well. I did make a slight change to this recipe – just making half the chocolate chunks white chocolate rather than all dark as I simply love white chocolate and thought it made more interesting. And triple rather than double chocolate can never be a bad thing!DSCF9091I loved how these turned out – they were so perfectly round! They had those moreish crispy edges, a soft middle, plenty of cocoa flavour and a generous helping of chocolate. I overuse this word so much but seriously – these really are addictive. I may or may not have eaten one for breakfast. Or even more than one…Anyhow! The office liked them, I liked them, my family liked them. The only people still waiting are my friends! You can find pretty much the same recipe here – the only difference is the book had 300g of chocolate and I didn’t freeze them. Enjoy!

DSCF9094

Tuesday, 24 April 2012

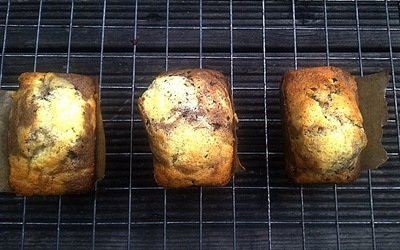
Mini Marble Cakes

Once I realise what I want to bake, I tend to become quite stubbornly specific about that idea. I have to hunt through the indexes of cookbooks, trying to see if they have the recipe I have in mind. Unsurprisingly, today I didn’t find a specific recipe for mini marble loaf cakes that I wanted. Guess I'll just have to write my own book one day! The inspiration came from a link I’d bookmarked, but on closer inspection that used 3 whole eggs and 2 egg yolks and I didn’t want the faff of using up the egg whites. Many of the marble cakes I saw seemed quite dry or difficult to downsize to my little batch. In the end, I heavily adapted a Mary Berry recipe (how can you go wrong?) and ended up with exactly what I’d wanted.mini cakesI’ve wanted to make a marble cake for a long time and it seemed the perfect way to use up odds and ends of chocolate. Using mini loaf pans made the marbling process a little bit more fiddly, but it was worth it in the end. The chocolate cake part is made using cocoa powder and dark chocolate chips, which means it isn’t too sweet against the light vanilla cake. The cakes are probably a little bit bigger than a cupcake (although some shop-bought cupcakes can be huge!) but seeing as they don’t have any icing they are not too rich and are the perfect teatime treat! I’d definitely like to experiment further with marble cakes when I have more ingredients in the house – a chocolate orange version, a coffee version, a version with dried fruit…so many ideas!mini cake

Mini Marble Cakes, adapted from a Marble Traybake recipe from Mary Berry’s Ultimate Cake Book

Ingredients: 110g butter
110g caster sugar
140g self-raising flour
1tsp baking powder
2 eggs
1tbsp milk
1/2 tsp vanilla essence
1tbsp cocoa powder
1tbsp hot water
50g dark chocolate, chopped
50g white chocolate, chopped

1. Preheat the oven to 180’C. Line 6 mini loaf tins with a strip of greaseproof paper.

2. Put the butter, sugar, flour, baking powder, eggs and milk in a food processor and beat until everything is well blended together.

3. Measure out half the cake mixture into another bowl. Add the vanilla essence and white chocolate chunks to the remaining mix in the food processor and stir to incorporate.

4. Mix the cocoa powder and hot water to a paste in a small bowl, then add to the other half of cake mixture along with the dark chocolate chunks.

5. Place a small teaspoonful of vanilla mixture into the bottom of each loaf tin, with a spoonful of chocolate mixture next to it. Layer up the two mixes in the tins, with alternating mixes on top of each other. Briefly marble with a thin cake skewer.

6. Bake for around 15-20minutes, until risen and set in the centre. Leave to cool before running round the edges of each tin with a knife and turning out.

Friday, 13 April 2012

White Chocolate Crème Brûlée with Passion fruit

I had quite a lot of inspiration to make this crème brûlée. Firstly, an article in the Times for a similar recipe which had passion fruit infused in it but no eggs – it was a simple ganache style recipe. Secondly, a random abundance of cream in my fridge that needed using up. Thirdly, it is my sister’s 20th birthday today and she loves white chocolate. As part of her birthday present I made her a book of 20 white chocolate recipes – truffles, cheesecake, tart, cake, mousse – every bake you can think of! A white chocolate crème brûlée was recipe number 16 and so I decided to combine the flavours of this brûlée with the Times passion fruit ideas. creme bruleeI’d never tried making a crème brûlée before but it is a dish I have often ordered at restaurants and enjoyed. I was apprehensive about doing it – visions of cream and eggs turning into a scrambled mess, slight concerns about setting the kitchen on fire with  a blowtorch – but it was actually easier than I thought. In this version, the white chocolate adds extra rich and creaminess to the custard that always contrasts so well with the dark caramel crunch of the topping. The tropical passion fruit works really well in cutting through the richness, preventing the dish becoming sickly and making it fresh. In a lot of white chocolate recipes the specific chocolate flavour gets lost, but happily in this recipe it is clearly distinguishable despite the actually rather small amount involved.white chocolate (2)White Chocolate Crème Brûlée with Passion fruit, adapted from a BBC recipe
Ingredients: 284ml double cream
50g white chocolate, broken into pieces
1 tsp vanilla bean paste
3 egg yolks
1 tbsp caster sugar , plus extra for topping
4 passion fruit

  1. Preheat the oven to 160'C/140'C fan. Heat the cream, chocolate and vanilla bean paste in a saucepan until the chocolate has melted. Take off the heat and allow to infuse and cool for 10 minutes.
  2. Whisk the egg yolks and sugar until pale, around 5 minutes. Pour in the chocolate cream. Strain into a jug and pour into 4-5 ramekins.
  3. Place in a roasting tray and pour boiling water halfway up the sides. Bake for 20-25 minutes until just set with a still wobbly centre. Chill in the fridge for at least 4 hrs.
  4. To serve, sprinkle a teaspoon of sugar on top of each brûlées and caramelise with a blowtorch or briefly under a hot grill. Leave caramel to harden and cool for a few seconds. Halve the passion fruit and scoop the pulp of one onto the top of each crème brûlée, then serve.


Friday, 10 February 2012

Blondies and Brownies In One

What shall I make this weekend…Cake or biscuits? Pie or tart? Delicate mini meringues or generous billowing pavlova?Such are the decisions faced by baking bloggers. Flavours are another decision to be made – nuts, fruit, spices, citrus, white chocolate, dark chocolate? Well, worry and dither no more as my bake today solves this last decision. Phew. ;)DSCF8939 Instead of having to choose between sweet white chocolate blondies or classic, rich dark chocolate brownies – combine the two. Even better, combine the two using heart-shaped cut-outs. Why? Just because you can, because its cute, because it’s nearly Valentine’s Day and because these are my entry to English Mum’s Valentines Day Baked With Love Bakeoff.

Baked-with-Love-Bakeoff-200px

I have embraced Valentine’s baking before but I didn’t last year so it felt good to be back with all things heart shaped, although I drew the line at pink or glitter this year. I’ve had this recipe from Smitten Kitchen bookmarked for a year, but this was finally the excuse I needed to bake them. I’ve tried blondies before but it’s always really hard to find a good recipe that lets the white chocolate shine, so I was keen to give this recipe a go. As I was making them I wasn’t convinced there was enough chocolate involved (you can never have too much!) so I added chocolate chunks as well and it was definitely worth it – they added bursts of chocolate flavour and caramelised slightly which was delicious. Both the brownie and blondie recipes worked very well, particularly the brownie which stayed really moist and fudgy. DSCF8933Some of my blondies ended up being a bit small for the heart cutter, so I used my smallest circle instead. It was quite a delicate process swapping the brownie circle centres as they were so moist, and it was definitely easier with the bigger hearts. Overall though they turned out really well – quite the treat! The combination of blondie and brownie at once was intriguing as the two chocolates worked really well together. DSCF8934I know the amounts in the recipe are a bit strange, (the recipe was converted from American measurements and then halved) but if you have a digital scale then it should be no problem. It makes a small batch of 12 finished combined brownies as well, so if you’re feeding a crowd definitely double it. I’ve just put the amounts once, so just switch the chocolate after you’ve made the first batch.  I’m thinking these could work with any other cut-out shape for other times of year: pumpkin cutters at Halloween, Christmas trees at Christmas etc etc. For now, embrace the slightly cheesy aspect of this idea, and enjoy!

Blondie and Brownie Hearts, adapted from Smitten Kitchen

80g chopped white chocolate, split into 45g and 35g
56g butter
88g sugar
1 large egg
1 tsp vanilla
smidge of salt
40g plain flour

1. Preheat the oven to 180’C. Line a 8x8inch square tin. You will not fill the whole tin, so screw up some tin foil and place it in the tin to prevent the brownie mixture eventually spreading into a thin layer across the whole pan.

2.Melt the 43g of white chocolate and butter together in a bowl, over a saucepan of boiling water.

3. Take off the heat and whisk in the sugar (the mixture will look like it really wont work at this stage – carry on!). Whisk in the egg and vanilla and then finally fold in the flour, salt and remaining 57g of white chocolate chunks.

4. Pour the mixture into the tin, and bake for 15 minutes. Cut the brownies into six even squares (judge the sizes compared to your cutter – ensure there will be a decent border around the cut-out) and leave to cool. Use a heart cutter to cut a heart out of the centre of each brownie.

5. Repeat the whole recipe from step 1, but using dark chocolate throughout instead of white chocolate.

5. Put blondie hearts in brownie gaps and vice versa. Embrace the cute factor and enjoy!

Monday, 25 July 2011

White Chocolate & Raspberry Cookies

I wrote quite a deep, honest starting paragraph for this post. Then I looked at it and figured – this post is about a cookie. An almightily delicious and irresistible cookie yes, but a cookie nonetheless. So whilst there maybe a time for deep opening up, today I’m keeping it simple (I have a very delicious post coming up towards the end of the week) and just saying: you really must make these cookies.DSCF8706I don’t know how I originally came across this recipe as it is, rather embarrassingly, from the Carnation website. I have had the recipe saved for ages and every time I checked my ever growing list of links stored in my Recipes to Try file I’d remember them and remind myself to make them. Then I would promptly forget. Until one very rainy day last week when I got a huge craving for these – so much so that I was willing to go out in the rain to buy condensed milk, the key ingredient for these cookies as it ensures their really soft centres.DSCF8705These are rich – because of the sweet melting white chocolate and the rich dough – but that doesn’t stop them being moreish. Plus, the raspberries are nicely tart and if it’s pouring with rain in the middle of July then who doesn’t deserve a delicious cookie?! Or three. The actual dough was very quick to make but the repetitive process of making all the balls of dough, flattening them and adding the halved raspberries does take a little time. Beware – these cookie spread a lot. For my first batch (luckily only four or five) I made normal sized little balls of dough and the cookies turned out huge: over saucer sized. The recipe makes a lot but that really will not be a problem because like I say, they are very addictive. There will be fights over who gets the biggest one, trust me! Enjoy :) DSCF8699

Monday, 19 April 2010

White Chocolate Cookies

Sometimes in life, it is the simple things which are the best. A decent book, a sunny day, a single flower, a cosy hoodie. Its the same with food: a perfectly boiled egg, crunchy toast, a simple bowl of yoghurt and honey, a warm cookie. A warm white chocolate cookie, to be specific.DSCF6737And often, what seems so simple turns out so much more. I figured these would be a decent white chocolate cookie – sweet, satisfying and moreish. My friend P and I gave up chocolate for Lent, and decided to bake these after Lent as a celebration of the chocolate return. Along with Chocolate Honeycomb cupcakes, we had a marvellous day baking.DSCF6735The golden syrup in these cookies gives them a caramel flavour, as well as making these fudgy and chewy inside – when warm the larger ones verge into blondie territory! I was worried that once cool they would harden up and become all crunch no fudge, but happily the fudginess was there to stay :) The perfect sweet treat, much more than just a plain cookie and yet have that vital cookie characteristic – dangerously addictive. Enjoy!

White Chocolate Cookies
4oz (120g)  Butter
4oz (120g) Sugar
2oz (60g) Golden Syrup
8oz(240g) Self Raising Flour
4oz (120g) White Chocolate Chips
A few drops of Vanilla Essence
1 egg, lightly beaten 

1. Preheat the oven to 350F/Gas Mark 4/180’C  and butter baking sheets - or line with baking parchment.
2. Cream together the butter, sugar and golden syrup.
3. Add the vanilla essence, chocolate chips and the beaten egg.
4. Mix in the flour until all the ingredients are combined to form a firm dough.
5. Form small balls of mixture (about a rounded teaspoonful) onto the prepared baking sheets, allowing a little room for the biscuit to spread out, and press it down.
6. Bake in or near the centre of your pre-heated oven for about 20 minutes, or until golden brown.
7. Leave to cool on the trays. 
DSCF6755